
|
halfmoon 101 JEANS | Sew Along HOME On this page: Sew Along | Day 2 - Adjustments
Sew Along | Day 3 - Harvesting or Reclaiming denim |
 |
Hi there! Welcome to the halfmoon 101 JEANS Sew Along! I am so excited to hang out and sew jeans with you this month! Way back when I was a teen, I remember my mom telling me that she had even sewn her own jeans once. What!? You can sew your own jeans??? Blew. My. Mind.
The idea of sewing jeans may be two parts exciting to one part scary or intimidating. That's ok! Hopefully this sew along will ease some of your worries and support you along the way to your new perfect fitting jeans. Go blow all those minds out there, prancing about in your me-made jeans!
Whether you want some hand-holding, or are just looking for a few tips here and there, you are more than welcome on this jeans-making journey. You can always head back to the Sew Along HOME if you get lost. I'll update the schedule / table of contents with links to each page as we move through the month.
As always, if you haven’t found the information you need or if it’s a little confusing, just let me know! I’ll do my best to help!
Without further ado, let's get started!

If you haven't already, you'll want to go grab your halfmoon 101 JEANS sewing pattern. Many of the tips and tricks you learn through this sew along will be transferrable to other jeans patterns, too, but the way they're explained here will be geared toward the halfmoon 101 JEANS pattern.
Supplies:
- sewing pattern + tracing paper (I highly recommend you do not cut your pattern. Even if you're typically "team cut".)
- 1m - 2m (1⅛ - 2¼yd) non-stretch mid to heavy-weight denim fabric
- 0.4m - 0.5m (½ - ⅝yd) light to mid-weight woven cotton
- fusible mid-weight interfacing for the waistband and fly
- coordinating thread to sew the jeans together, contrasting thread for top-stitching
- one 17mm jeans button for the waistband closure
- either: a jeans zipper (view A) or two to three 15mm jeans buttons (view B)
- six or ten rivets (optional, but recommended)
- jeans sewing machine needles (single + twin recommended)
- zipper foot
- point turner (handy, but optional)
- hammer to set buttons and rivets
- wire cutter to shorten rivets
Notes on fabric:
- DENIM: this pattern is designed for non-stretch medium to heavy-weight (9-10oz.) denim twill fabric. Can you use lighter-weight fabric? Totally! What about super heavy weight? Also fine! You'll just need to take the particular features of your fabric into consideration when choosing a size.
- Lighter weight denim may have even more "give" than a mid-weight, so you may want your jeans to be quite snug at first try-on.
- Heavier weight denim may have less "give". You might also loose some of the width in the seams and need slightly more allowance when flat-felling seams. If this is the case, you may opt to size up.
- Not sure where to get denim?? Find some inspiration here!
- LINING: light to mid-weight woven cotton, cotton lawn or linen for pocket
bags, fly shield and waistband lining. This is a fun place to get really creative and use scraps of special fabrics that you might have if your stash!
Notes on notions and tools:
- My machines do not care for official "top-stitching thread", which is heavier than your standard all-purpose thread. Because of this, I just use regular, all-purpose thread for construction and top-stitching, but choose a contrasting color sometimes for the top-stitching.
- If your jeans buttons are a slightly different size, that's ok! Use what you have!
- A point turner, and even zipper foot, are super handy but not necessities.
- Not all rivets need to be cut to size.
- If you don't have jeans/denim needles, just use a heavier Universal needle (somewhere between 90/14 and 110/18, for example)
MEASURE YOUR BODY
While you should always measure your body before choosing a size to sew, I feel like this is especially important with this pattern. It feels strange to be measuring way up at your natural waist when these jeans are a lower rise, but this really will guide you to the most accurate size for your body (yes, even if you low waist is quite round). Here you can see these jeans on a few different body types.
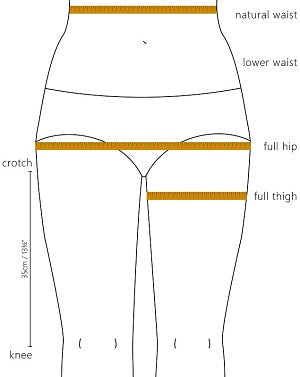
As you see on page 6 of the instructions, you'll want to measure your body in several different areas before choosing your size(s). Hold the measuring tape snug on your body, but not so tight that it's squeezing you.

I recommend putting on a pair of leggings when measuring your body as the crotch intersection will help you when measuring the rise. Note down all your measurements on your pattern or a piece of paper.
| natural waist | full hip | thigh +/- 5cm (2") down from crotch |
 |
 |
 |
| crotch to knee | front rise | back rise |
 |
 |
 |
PREDICTING BASIC ADJUSTMENTS + CREATING YOUR PATTERN
Before printing your pattern or cutting into any fabric, I recommend identifying any basic adjustments you might need. It's entirely possible you'll find you need further adjustments after sewing your muslin or toile, but things like blending sizes and adjusting rise can likely be predicted ahead of time, hopefully reducing the number of toiles you need to make.
Again, I urge you to NOT cut into your pattern. I know that tracing can be a huge pain, but trousers and jeans can be finicky, and having to re-print and re-tape everything is likely to be more of a drag than tracing. There's my two cents:)
Here I'll share a couple examples of basic blending adjustments. Tomorrow I'll be publishing several more posts on adjustments as well as another "real life example".
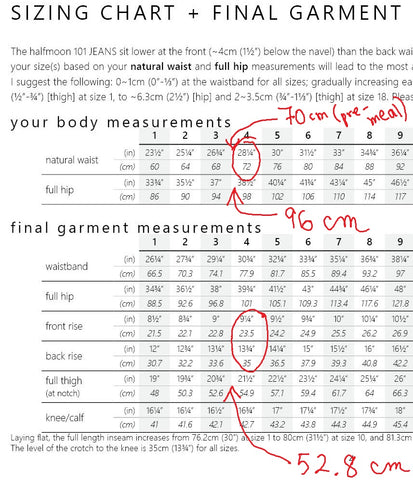
Me (Meghann): I have a very elastic tummy which fluctuates a lot during the day based on when I've eaten. As this waistband curves just under my tummy, I've decided to use my pre-meal natural waist measurement (70cm) as opposed to my post-meal measurement (72cm). (Also, I've made these 4 times, so I just know this now:)
My measurements:
- Natural waist: 70cm or 27½" (up to 72cm or 28¼")
- Full hip: 96cm or 37¾"
- Thigh: 52.8cm or 20¾"
- preferred Front Rise: 23.5cm or 9¼"
- preferred Back Rise: 35cm or 13¼"
For the width of the jeans, I'm directly between size 3 and 4. To keep it kind of simple, I've decided to simply trace all pattern pieces directly between the two sizes. You can see here that the dark pink line is the size 3, but I've drawn and cut on another line directly between the 3 and 4. I also made notches and markings directly between the two sizes.


A student of mine: I'm using a student as an example as I've had questions from a few of you with similar body types. Namely, your natural waist puts you 2 sizes higher than your full hip. That's fine! I'll show you the measurements here, with examples below on how we traced the pattern.
Student's measurements:
- Natural waist: 92cm or 36¼"
- Full hip: 110cm or 43¼"
- Thigh: 63cm or 24¾"
- preferred Front Rise: 26.5cm or 10⅜"
- preferred Back Rise: 41+cm or approx. 16¼"
Some of these measurements correspond well to a size, and others are between sizes. Based on these measurements, we opted to start with size 9 waist, grading down to a size 7 hip and back toward a 9 at the thigh. Although she's between 8 and 9 on the rise, we're going with a size 9 front and back rise for now. We can always pinch some fabric out if needed when we baste fit.
I'm going to demonstrate this example using the back leg (2) and back yoke (3) as this requires a little more creativity than the front leg (1).
Step 1: Trace off the back yoke (3) in a size 9, indicating the size 8 as well. Then draw the stitch line, 1.5cm (⅝") from the edge of the size 9. Do the same thing at the top of the back leg (2). Don't forget to mark the notches.

Step 2: As if you were going to sew these together, line up the "raw edges" and notches (I'm using the size 9 notch) of the back yoke (3) and leg (2), then fold the back yoke along the stitch line. I've marked sizes 7, 8 and 9 in different colors to make it easier to see.

Step 3: Starting about 1.5cm (⅝") from the top edge of the back yoke, gradually grade along the back curve through the middle size (here, the size 8) to the lower size (here, the size 7) at the crotch hook. This is the red line below.

I hope you've found this information useful! If you'd like more info on adjustments, take a look at these posts that Anne wrote on blending between sizes, adjusting the crotch and adjusting for full thighs and/or knock knees. You can also see her real-life fitting experience here.
If you're ready to jump in and start sewing, you can grab your halfmoon 101 JEANS sewing pattern here!